
I strongly suggest readers checkout my two prior blogs on Cryptography, Principle of Least Privilege, and Biometrics. All of these will be explored in depth throughout this blog.
Introduction
My intent has been to educate readers on some basic and fundamental security principles that they experience every day. Readers might have been spurred by some high profile cases, like the FBI-Apple case, to research their technology. My goal is to answer the question, “How is my life affected by technology,” while focusing on the interaction between users and security features. I believe it’s important that people have a place to become more familiar with the devices that contain such intimate and personal data.That leads me to the purpose of this blog–to educate readers about the iOS Security through a top down view of the device’s architecture. Note: the information in this blog was taken directly from Apple’s iOS Security Guide, and what follows is my understanding of their system.
A Top Down View
Visualizing is the most effective way to demonstrate the Principle of Least Privilege (or more accurately, we see a separation of duties) and indicates where we can start to connect the individual pieces of the architecture. More specifically, visually exploring the separation of duties it will demonstrate the need for the Secure Enclave. The following image is Apple’s rendition of the security architecture in iOS:

I want to point out the separation that exists between software and hardware/firmware in the image. The depicted architecture is demonstrating an important idea of the principle of least privilege. We see that Apple chose to separate the software and the hardware through one linking path–our black arrow. Recognize that this seems like the perfect place to use cryptography because there are two things that need to communicate.
Additionally, notice that there are little sandboxes that serve as an indicator for us that we can split this system up further. For software applications, we can apply the principle of least privilege not only through code, but through managing the memory addresses each process (or program/application) may access. So you can imagine each square representing locations in memory that the particular process can access.
Next, we’ll see how and by whom the communication between these sandboxes is handled.
The Secure Enclave
Nothing happens in your iPhone without first communicating with the Secure Enclave. Between the apps you run, updating your iOS version, or even simple things like accessing your contact list–all of this is validated against the Secure Enclave (from here out, I’m just going to call it the enclave).
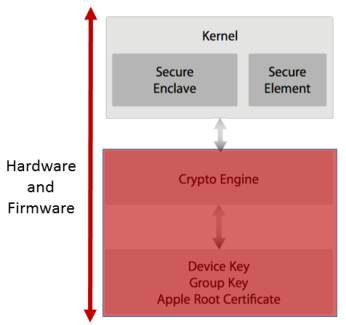
From the image, Apple specifies that our enclave resides in the kernel memory space, or more accurately, things must first request access to information contained in the enclave, through the kernel (essentially just a driver of your phone). The kernel handles most verification of data that gets brought in and sent out by the operating system (think opening a file and modifying it). It also controls most connections to and from the device, like connecting your charger.
Past the enclave, there is a separate processor, called the “Crypto Engine” that handles applying all encryption and decryption of the device (meaning it performs the operation itself). Further down, we reach silicon, and on the silicon is imprinted the device key, group key, and Apple root certificate. The following lists the purpose of each key:
- The device key (UID) is given to the device at the time of manufacturing and is not accessible to other parts of the system and is not known by Apple.
- The group key (GID) indicates the type of processor present on the phone (like an A8).
- The Apple root certificate is used to verify the Apple server that sends out updates to iPhones.
Both the UID and GID are used in creating the keys that are applied in encrypting the files on the device (the file system key). The benefit of including these keys in silicon rather than in read-only memory, is that if someone were to remove the hard drive, they still would be unable to break the encryption since it is inherently tied to a specific device.
Down in the secure enclave, we also find the storage for the touchID sensor. Every time a user enters their fingerprint to unlock the device, the secure enclave gets an updated version of the fingerprint’s map, creating a more accurate print. The finger print data is used in place of a passcode as a “biological password”. Note: Personal information is not tied to the fingerprint data, and Apple has no knowledge of what is saved.
Additionally, the secure enclave serves as a storage medium for all the other keys generated after the phone is turned on. That includes those used in iMessage, starting apps, etc. We can think of it as an archive of keys that we can query against and every bit of data we access will be validated.
User Data Protection
User data protection sounds kind of dry, but rest assured there’s a ton of really cool processes happening that, as an iPhone owner, I had no idea existed. These processes exist to ensure the software you’re using is the correct software and not some malware loaded up without your knowledge.
“Can I see some ID?” — Apple’s Crypto Engine
When looking at the iOS architecture, it almost seems more appropriate to visualize the crypto engine as a sort of bouncer, or gate keeper to the secure enclave. The crypto engine will act as our validation tool (actually performing the encryption/decryption operations) by verifying the keys of data that is requested through the secure enclave. The following imagine demonstrates how I prefer to think of our system:

Let me digress for a moment because my image isn’t entirely accurate and there’s a reason Apple described their architecture in a different manner. Recall that the secure enclave handles all key generation and storage–that includes the keys used for encrypting/decrypting the data that travels between the hard drive and the operating system’s main memory (using AES-256). Therefore, it’s fun to visualize this process as a sort of gate keeper scenario.
Unfortunately, this is somewhat inaccurate. Apple describes the process in more depth, but just know it involves a request being sent to the secure enclave, and the enclave itself querying against the crypto engine. However, that doesn’t let me sneak in dumb jokes, so I like to think of it differently.
Similarly, this process is repeated for all types of requests for memory and now we see all aspects of the hardware and firmware which are involved in using the device.
Operating System Authentication
What happens when an iPhone is issued an update? It’s usually seamless for the user, but there is actually quite a bit of verification happening at many levels. Starting out, the device begins communicating with Apple’s Servers, and requests an update. Next, our phone is verified as the correct phone and also checked to ensure it is allowed to receive the update. Assuming all goes well, Apple serves us the update, and the phone automatically applies it. Next, the operating system attempts to start up, and at each individual step, the device checks our Apple root certificate key (that key saved on silicon) to ensure that the update we received was signed by Apple before we allow anything to load. The device won’t continue to start up if any step in this process fails–i.e. the update could have been maliciously sent to us, or it at least wasn’t signed by Apple (indicating there could be some sort of malware attached to it).
This process is very good at protecting your device for one primary reason. Namely, verifying the update based on the root certificate ensures that at any point, you are not installing a different operating system. Some view this as limiting, others don’t, but it assuredly prevents unwanted intrusions. The prominent example of this in action was the recent dispute between the FBI and Apple (the one I’ve mentioned in every blog post of this series). The FBI wanted to read the data on the phone, and they could if they were able to install their own operating system that didn’t care about the pass-codes and protections that were left in tact. However, Apple refused to sign whatever they created for the task (remember, it’s necessary Apple signs any changes to the operating system). Eventually, the FBI managed a way around this protection, and I won’t go into the details, but for the average reader, rest assured because you’re information is most likely not worth enough to the FBI to warrant the work that went into cracking the device.
File Data Protection
The protections in place surrounding the files and information stored in a device is a perfect place to demonstrate the collaboration between the enclave and crypto engine. Along the way, we’ll discover a bit about the iOS file system, but that’s to be expected.
Apple’s Data Protection specifies how the files or data on the system are managed, specifically how files should be accessed while remaining secure. Data Protection is controlled on a per-file basis by assigning every file to a class, and determining allowed access based on unlocking the class keys. I’ll barely scratch the surface on this subject so I highly recommend readers continue this topic on their own because it extends well beyond the files.
In the following example let’s assume we have a file we want to access that is located on the hard disk (i.e. is currently encrypted and unopened).
Every file contains metadata, which generally includes things like processes currently accessing the file, has it been modified, etc. Additionally, our’s contains a file key that will decrypt the file contents. If you remember, when the file was created, it was assigned one of several class keys that encapsulates this file key. The class key that is assigned depends on the intent of the file–who should read it, are people allowed to write to it, etc. Additionally the class key wraps up the file key and meta data. This is less for safety and more for the purpose of managing file-access. All the kernel needs to do is apply a master key (one that knows of all the class keys) and check which class key was undone and that’s what denotes the intent of the file. Check out Apple’s documentation for a specific list of class keys that hopefully will help solidify the purpose of having such a key.
The hardware key is the very same that was imprinted into the silicon. The passcode key is exactly as it sounds–if the user uses a passcode, then a key will be generated. Additionally, the passcode key may be generated with help of the touchID sensor, using fingerprint data to as a source of “randomness”. These two keys together are able to unlock the class key, accessing the file metadata (which is still encrypted, but now unwrapped).
Finally, that leaves the file system key. This key is unique because it is used to encrypt all file metadata. It is created when iOS is first installed, or when the device is wiped by the user. Interestingly, when the user selects “Erase all content and settings”, the file system key is the only thing that is destroyed, not the data. Destroying the file system key effectively deletes the data, because now there is no way to decrypt it, but the bits of information are still there.

The linking of all these keys together is complicated, and I strongly advise the reader to take a moment to read the diagram.
An important note: All of this key management is contained within the secure enclave. That includes the unwrapping of the class key, accessing the file metadata, all the way to decrypting the contents. That’s why the enclave is so vital to us–so many operations go into just opening a file, and that’s not all it does!
Application Protection
Similar to updating the operating system, applications follow a type of certificate based authentication. In fact, all apps that run on the device are validated by the enclave to some extent. In general, the native apps (like Safari and Mail) that come with the device are pre-signed by an Apple certificate. All other 3rd party apps, after going through the app approval process are issued a certificate by Apple. Upon installation and every time the app runs, the enclave verifies against this certificate. For more information about this topic, Apple provides a lot of developer resources starting here.
Another security measure used in protecting apps is called sandboxing. Sandboxing is essentially creating a range of memory an app can operate inside of, and if anything attempts to leave that area, there are problems. This means that apps are restricted from accessing files that belong to other processes or from making changes to the device.

Notice on the diagram (we’ve seen this multiple times in different iterations) that app sandbox encapsulates the data protection class. Additionally, remember the data protection class is just a fancy way of saying a file–a file that is all wrapped up in a bunch of different keys. Well, apps keep all their resources that are required to run, inside of a file, therefore our apps reside inside this sandbox.
The reason sandboxing is so effective is because it allows us to easily maintain an address space and to check if anything is trying to leave it. We only have one rule to impose–stay within memory bounds. This is our principle of least privilege at work! Apps can only access their own data, they don’t need to know what other apps are doing. This is essential in preventing malicious programs from spreading throughout memory.
iMessage Security
iMessage is a messaging service that is routed through Apple’s Push Network and encrypted end-to-end, meaning only the two communicating can decrypt the message. All iPhone-to-iPhone communication runs through Apple’s Push Network. Some forms of cryptography used include:
- RSA 1280-bit key: Used for the key exchange.
- AES-128 bit key: Used for encrypting the actual message
- SHA-1 hash: Used to ensure the validity of each message (not covered in my previous blog)
- P-256 bit key (this is a form of elliptical curve cryptography that was not covered in my previous blog): Used for signing the hash.
Perhaps discussion of the iMessage cryptosystem as a whole merits a whole other blog post, but that is for another time. For now, I’d like the reader to see the level of security that goes into sending messages out of a device. This level of security is typical for outward communication, or sending data to something outside of the device’s physical ecosystem (i.e. it’s leaving the architecture described in this blog, and going to some other device). Further reading on the iMessage protocol can be found in Apple’s documentation, or if you’re interested in attempts to break the protocol, start with John Hopkins.
Conclusion
My hope is that you’re leaving this blog with a firmer understanding of the security found in one of the most common devices around. We saw how the principle of least privilege can be used in tandem with cryptography and biometrics to create a secure cryptosystem.
I’d like to thank everyone who read this series, and I hope I addressed all your concerns with enough detail to keep you interested, but not too much for the information to just fly over your head.
Some Important Resources I Used
Apple Inc. (2015, September). IOS Security. Retrieved March 31, 2016, from https://www.apple.com/business/docs/iOS_Security_Guide.pdf

You must be logged in to post a comment.